VP Overlay Chart for Profile Projector/Optical Comparators (Customizable)
Category: Profile Projector, Profile Projector
Features
Overlay Charts for Profile Projector/Optical Comparator
Our products are design to assist you in realizing the maximum potential from your visual inspection system. Most standard products you will find in our choices can be customized to meet your requirements. We offer various levels of certification for these products.
We can also help in the certification and inspection of most any precision measuring instrument.
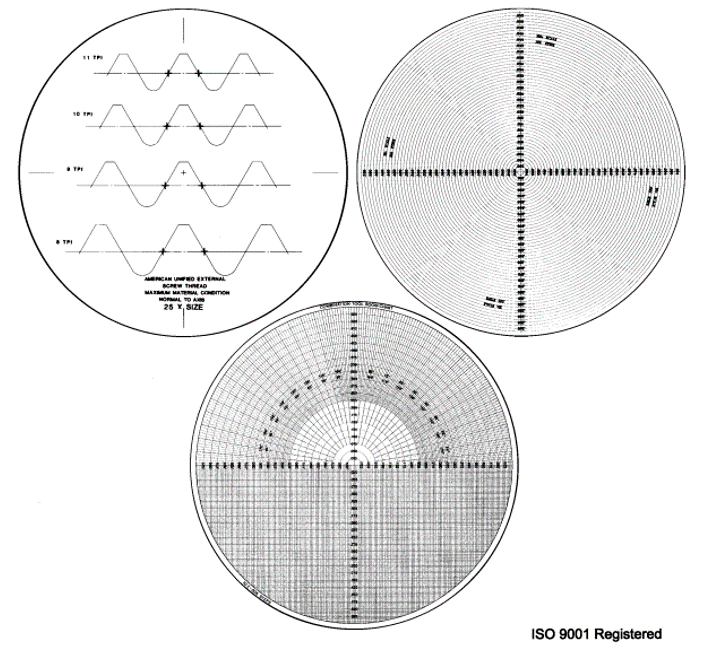
Our overlay charts available to combined with multiple magnifications in one chart!
Our overlay charts also available in two materials, glass and plastic.
Standard Certification Services and Documents
There are four standard levels of certification that can be offered to customers:

CUSTOM CERTIFICATION SERVICES and DOCUMENTS
VP can also help you in the certification and inspection of most any precision measuring instrument. We have certified customer supplied charts, scales, reticles, stage micrometers. graticles, loupes, calibration targets, etc.
Level 1 – GENERAL CERTIFICATE OF CONFORMANCE
This is our basic certificate and is issued with every item shipped. No serial numbers or actual measurements are stated on the certificate.
Level 2- CERTIFICATE OF ACCURACY – Short Form
This certificate is provided for a product that has been inspected visually to ensure that it’s accuracy is within the value stated on the certificate. A serial number is assigned and is placed on the document and the product.
Level 3 – CERTIFICATE OF ACCURACY – Long Form
This certificate is provided for a product that has been inspected with a measurement device. A deviation report is generated detailing point by inspection of relevant features per the engineering drawing. A serial number is assigned and is placed on the document and the product.
Level 4 – CERTIFICATE OF ACCURACY – 3rd Party Inspection
This certificate is provided for a product that has been inspected with a measurement device. A deviation report is generated detailing point by inspection of relevant features per the engineering drawing. A serial number is assigned and is placed on the document and the product. A third party inspection report is provided. This report documents additional information specified in the IEC/ISO 17025:1999 (E) requirement booklet.
Centerline Screens (Glass Only)
- Standard glass centerline screens are basic for any optical comparator overlay chart.
- Protractor rings can be added to any screen.
- Other angular line combinations are available upon request.
- Screens can be ordered with solid or colored lines if desired.


Centerline Screens (Glass Only)
- Protractor rings can be added to any screen.
- Other angular line combinations are available upon request.
- Glass rectangular block screens available in all diameters up to and including 30.75″ (780mm) diameter.
General Screens and Charts
(Available in Glass or Plastic material)

Combination Radius – Grid Chart
.png)
.png)
Grid Chart
.png)
.png)
360° Radius Chart
.png)
.png)
Radius Chart 0.001 Increments Progressive in Each Quadrant
.png)
.png)
Radius Chart 360° 15° 30° 45° 60° 75° Angles
.png)
.png)
Radius Chart 360° Combinations 4 Magnifications on Chart
.png)
.png)
Radius Chart 360° Combinations 4 Magnifications on Chart
.png)
.png)
Radius Chart – All Magnifications
.png)
.png)
180° Radius Chart
.png)
.png)
Combination Radius and Angle Chart
.png)
Protractor Screens
(Available in Glass material only)

Marked every 10° graduated every degrees. Available in all diameters up to and including 30.75″ (780mm) diameter.

Marked every 5° graduated every degrees; 0 to 360° shown. Available in all diameters up to and including 30.75″ (780mm) diameter.

Marked every 5° graduated every degrees; 0 to 90° quadrant. Available in all diameters up to and including 30.75″ (780mm) diameter.
Combination Radius – Grid Chart with Protractor Ring

Protractor and Radius Charts
(Available in Glass and Plastic material)

Marked every 5° graduated every 30 minutes; 0 to 360° shown. Available in all diameters up to and including 30.75″ (780mm) diameter.

Marked every 5° graduated every 30 minutes. Available in all diameters up to and including 30.75″ (780mm) diameter.
.png)
Small radius charts available up to 14.5″ (368mm) diameter.
Radius Chart


Large radius charts available in most sizes.
Large Radius Chart*

*Size range is based on 14″ (355mm) diameter (range is greater on larger diameters)
Custom Comparator Charts
Simplify Checking of Complex Production Parts

A custom comparator chart can solve a lot of problems quickly and inexpensively. Our design group has been creating “Special Application” charts for over 35 years. We can design and manufacture a comparator chart dedicated to your part and perfectly suited to your checking application.
We can create a chart from your part drawing or electronic CAD file. Features can include multiple views, graphic & numerical tolerances, datums, and theoreticals. The electronic files for charts are maintained for easy and inexpensive duplication and/or modification when a revision crops up.
A VP custom comparator chart can help you simplify a complex inspection job for your quality system.

Inquiry - VP Overlay Chart for Profile Projector/Optical Comparators (Customizable)








.png)
